This Week in London – Commemorating the Battle of the Somme; Transported by Design; and, Winifred Knights at Dulwich…

Battle-of-the-SommeThe Imperial War Museum in Lambeth is holding a free late night opening tonight featuring live music, film screenings, immersive theatre and poetry to mark the 100th anniversary of the Battle of the Somme. Highlights of Night Before the Somme, which runs from 8pm to midnight tonight, include slam poet Kat Francois’ critically acclaimed play Raising Lazarus, poet and broadcaster Ian McMillan’s show Magic Lantern Tales, and extracts from the immersive production Dr Blighty – which tells the story of the million Indians who travelled to fight in the war. Visitors will also have the chance to watch the film, The Battle of the Somme (filmed and screened in 1916, it was the first feature-length documentary about war), listen in to a series of Q&A’s with experts on the battle, and preview the major exhibition, Real to Reel: A Century of War Movies. Real to Reel, which officially opens on Friday, explores how film-makers have found inspiration in compelling personal stories and the real events of wars from the past century. As well as audio-visual installations, the display features film clips, costumes, props, scripts, sketches and designs from films such as The Dam Busters, Where Eagles Dare, Apocalypse Now, Battle of Britain, Das Boot, Casablanca, Jarhead, Atonement and War Horse along with original archival material and artefacts from the IWM collections. The exhibition, which is divided into five sections, runs until 8th January. Admission charges apply. See www.iwm.org.uk for more. PICTURE: © IWM (Q 70164. Staged scene from The Battle of the Somme film, 1916 British troops go ‘over the top’ into ‘No Man’s Land’. This scene was staged for the camera at a training school behind the lines.

• Don’t forget tonight’s vigil at Westminster Abbey to mark the 100th anniversary (as mentioned in last week’s entry here).

Still on the centenary of the Battle of the Somme and a new exhibition opened at the Science Museum in South Kensington this week focusing on the innovations in medical practice and technologies developed as a result of the new kind of industrialised warfare seen in the battle. Wounded: Conflict, Casualties and Care has at its centre a collection of historic objects from the museum’s World War I medical collections including stretchers adapted for use in narrow trenches and made-to-measure artificial arms fitted to the wounded in British hospitals as well as lucky charms and personal protective items carried by frontline soldiers. There are also artworks from the period including Henry Tonk’s famous pastel drawings of facial injuries and a 1914 painting by John Lavery that depicts the arrival of the first British wounded soldiers at the London hospital. Admission is free and the exhibition can be seen until early 2018. For more, see www.sciencemuseum.org.uk.

Regent Street will be transformed on Sunday, 3rd July, with the Transported by Design Festival featuring transport designs which have shaped and will shape London. The festival, which will stretch from Piccadilly Circus to Oxford Circus Tube stations, will see the street divided into three zones – past, present and future. Among the objects on show in ‘past’ section will be a horse-drawn bus and other heritage buses, a 1927 train carriage and an exhibition of classic advertising posters and signage while the ‘present’ section will feature ‘Cycle Spin Fun’ by Santander Cycles, Moquette Land – a showcase of fabric used across the transport network, and, a ‘design a bus’ competition, and the ‘future’ section will feature a range of technologies, including virtual reality headsets, exploring what transport could look like in 2040. The free festival, part of the ‘Summer Streets’ program which sees Regent Street closed to traffic on Sundays over summer, runs from noon to 6pm. For more, see www.tfl.gov.uk/campaign/transported-by-design/event-calendar?intcmp=40582.

• The work of artist Winifred Knights, the first British woman to win the Prix de Rome scholarship, is the subject of a recently-opened exhibition at the Dulwich Picture Gallery. The display, the first major retrospective of the work of Knights (1899-1947), brings together more than 70 preparatory studies and her most ambitious works including The Deluge (1920), The Potato Harvest (1918) and Leaving the Munitions Works (1919). Winifred Knights (1899-1947) runs until 18th September. Admission charge applies. For more, see www.dulwichpicturegallery.org.

Send all items for inclusion to exploringlondon@gmail.com.

This Week in London – Commemorating the Battle of Jutland; ‘lost’ Egyptian cities; and, new Blue Plaques…

The largest naval conflict of World War I – the Battle of Jutland – is the subject of a new exhibition opening at the National Maritime Museum in Greenwich tomorrow. BugleMarking the centenary of the battle, Jutland 1916: WWI’s Greatest Sea Battle explores the battle itself (which claimed the lives of more than 8,500 as the British Grand Fleet met the German High Seas Fleet in what neither side could claim as a decisive victory) as well as its lead-up, aftermath and the experience of those serving on British and German warships through paintings and newspaper clippings, photographs, ship models and plans, sailor-made craft work and medals. Among the objects on display is a 14 foot long shipbuilder’s model of the HMS Queen Mary, which, one of the largest battle cruisers involved,was destroyed with only 18 survivors of the 1,266 crew. Among the personal stories told in the exhibition, meanwhile, is that of boy bugler William Robert Walker, of Kennington, who served on the HMS Calliope and, severely wounded during the battle, was later visited by King George V
and presented with a silver bugle by Admiral Sir John Jellicoe (the bugle, pictured, is on display). A series of events will accompany the exhibition which runs until November. Admission is free. For more, see www.rmg.co.uk/national-maritime-museum. PICTURE: © National Maritime Museum, London 

• Two ‘lost’ Egyptian cities and their watery fate are the subject of a new exhibition which opens at the British Museum today. Sunken cities: Egypt’s lost worlds is the museum’s first exhibition of underwater discoveries and focuses on the recent discoveries of Thonis-Heracleion and Canopus – submerged at the mouth of the Nile for more than 1,000 years. Among the 300 objects on display are more than than 200 artefacts excavated between 1996 and 2012. Highlights include a 5.4 metre statue of Hapy, a sculpture excavated from Canopus representing Arsine II (the eldest daughter of the Ptolemaic dynasty founder Ptolemy I) who became a goddess after her death, and a stela from Thonis-Heracleion which advertises a royal decree of Pharaoh Nectanebo I concerning taxes.  The exhibition runs until 27th November. Admission charge applies. For more, see www.britishmuseum.org.

New English Heritage Blue Plaques marking the homes of comedian Tommy Cooper and food writer Elizabeth David have been unveiled this month as part of the 150th anniversary of the scheme. Tommy Cooper lived at his former home at 51 Barrowgate Road in Chiswick between 1955 to 1984 and while there entertained fellow comedians such as Roy Hudd, Eric Sykes and Jimmy Tarbuck. Elizabeth David, meanwhile, is the first food writer to ever be commemorated with a Blue Plaque. She lived at the property at 24 Halsey Street in Chelsea for some 45 years until her death in 1992. For more, see www.english-heritage.org.uk/visit/blue-plaques/.

Send all items for inclusion to exploringlondon@gmail.com.

A Moment in London’s history…The ‘longest night’…

FirefightersIt was 75 years ago this year – on the night of 10th/11th May, 1941 – that the German Luftwaffe launched an unprecedented attacked on London, an event that has since become known as the ‘Longest Night’ (it’s also been referred to as ‘The Hardest Night’).

Air raid sirens echoed across the city as the first bombs fells at about 11pm and by the following morning, some 1,436 Londoners had been killed and more than that number injured while more than 11,000 houses had been destroyed along and landmark buildings including the Palace of Westminster (the Commons Chamber was entirely destroyed and the roof of Westminster Hall was set alight), Waterloo Station, the British Museum and the Old Bailey were, in some cases substantially, damaged.

The Royal Air Force Museum records that some 571 sorties were flown by German air crews over the course of the night and morning, dropping 711 tons of high explosive bombs and more than 86,000 incendiaries. The planes were helped in their mission – ordered in retaliation for RAF bombings of German cities – by the full moon reflecting off the river below.

The London Fire Brigade recorded more than 2,100 fires in the city and together these caused more than 700 acres of the urban environment, more than double that of the Great Fire of London in 1666 (the costs of the destruction were also estimated at more than double that of the Great Fire – some £20 million).

Fighter Command sent some 326 aircraft into the fight that night, not all of them over London, and, according to the RAF Museum, the Luftwaffe officially lost 12 aircraft (although others put the figure at more than 30).

By the time the all-clear siren sounded just before 6am on 11th May, it was clear the raid – which turned out to be the last major raid of The Blitz – had been the most damaging ever undertaken upon the city.

Along with the landmarks mentioned above, other prominent buildings which suffered in the attack include Westminster Abbey, St Clement Danes (the official chapel of the Royal Air Force, it was rebuilt but still bears the scars of the attack), and the Queen’s Hall.

Pictured above is a statue of firefighters in action in London during the Blitz, taken from the National Firefighters Memorial near St Paul’s Cathedral – for more on that, see our earlier post here.

For more on The Longest Night, see Gavin Mortimer’s The Longest Night: Voices from the London Blitz: The Worst Night of the London Blitz.

Special – 10 London ‘battlefields’, a recap…

It seems an age ago that we started this Wednesday series on some of London’s ‘battlefields’ (we’ve used quotes given many of the battlefields we’ve covered haven’t featured what we might think of as having hosted battles in the traditional sense).

But we’ve finally come to an end, so before we launch a new series next week, here’s a recap of what the series entailed and please vote for your favourite below…

10 London ‘battlefields’ – 1. Queen Boudicca takes on the Romans…

10 London ‘battlefields’ – 2. ‘London Bridge is falling down’…

10 London ‘battlefields’ – 3. London sacked in the Peasant’s Revolt…

10 London ‘battlefields’ – 4. Jack Cade’s rebellion…

10 London ‘battlefields’ – 5. Battle of Barnet…

10 London ‘battlefields’ – 6. Battle of Turnham Green…

10 London ‘battlefields’ – 7. Battle of Brentford…

10 London ‘battlefields’ – 8. The Gordon Riots…

10 London ‘battlefields’ – 9. The Battle of Cable Street…

10 London ‘battlefields’ – 10. The Battle of London…

10 London ‘battlefields’ – 10. The Battle of London…

The final in our series looking at London ‘battlefields’, this week we take a look at the so-called Battle of London, the air war fought over London during World War II which, along with the bombing of other British cities, is best known by the phrase The Blitz (it forms part of the greater Battle of Britain).

Blitz-memorialTaking place from the afternoon of 7th September, 1940, until May, 1941, the Blitz saw London sustain repeated attacks from the German Luftwaffe, most notably between 7th September and mid November when the city was bombed on every night bar one.

The night of 7th September, the first night of the Blitz (a short form of ‘Blitzkrieg’ – German for ‘lightning war’), was among the worst – with more than 450 killed and 1,300 injured as wave after wave of bombers attacked the city. Another 412 were killed the following night.

One of the most notorious raids took place on 29th December when  incendiary bombs dropped on the City of London starting what has been called the Second Great Fire of London. Around a third of the city was destroyed, including more than 30 guild halls and 19 churches, 16 which had been rebuilt by Sir Christopher Wren in the aftermath of the Great Fire of London in 1666.

The city was only attacked sporadically in the early months of 1941 but the night of the last major raid of the Blitz – that of 10th May, a night subsequently known as The Longest Night – saw the highest casualties of any night with almost 1,500 people reportedly killed.

The Blitz killed almost 30,000 civilian in London, and destroyed more than a million homes with the worst hit districts poorer areas like the East End.

The battle wasn’t one-sided – the RAF fought the Luftwaffe in the skies and did have some wins – on 15th September (a day known as Battle of Britain Day), for example, they shot down some 60 aircraft attacking London for the loss of less than 30 British fighters.

It was this victory which led the Germans to reduce the number of daylight attacks in favour of night-time raids which, until the launch of the RAF’s night-time fighters in 1941, meant they met little effective resistance. This included that of ground defences – throughout December, 1940, it’s said that anti-aircraft fire only brought down 10 enemy planes.

Yet, the Blitz did not lead to a German victory. For the Nazi regime, the purpose of the constant bombing of London (and other cities) was aimed at sapping the morale of its residents to the extent that they would eventually be forced to beg for peace. But the plan failed and Londoners, digging deep, proved their mettle in the face of fear.

Hundreds of thousands of people were involved in  Civil Defence working in a range of jobs – everything from air raid shelter wardens to rescue and demolition teams – and worked alongside firefighters whose numbers were supplemented by an auxiliary service. Naturally all suffered a high level of casualties.

As the weeks passed, the carnage mounted in terms of the loss of and damage to life, destruction of property and psychological toll. And yet the Londoners – sheltering Underground, most famously in the tunnels of the Tube – survived and, as had been the case after the first Great Fire of London, the ruined city was eventually rebuilt.

There are numerous Blitz-related memorials in London, many related to specific bombings. But among the most prominent are the National Firefighters Memorial, located opposite St Paul’s Cathedral, which pays tribute to the firefighters who lost their lives in the war (as well as in peacetime), and a riverside memorial in Wapping honouring civilians of East London killed in the Blitz.

10 London ‘battlefields’ – 9. The Battle of Cable Street…

We hit the 20th century with this London ‘battle’, a confrontation in Stepney between police and a range of anti-fascist and fascist forces in the lead-up to World War II.

Battle-of-Cable-Street-red-plaqueThe ‘battle’ took place on a Sunday – 4th October, 1936 – following a summer of anti-Semitic violence and was sparked by a decision by the British Union of Fascists, led by Sir Oswald Mosley , to march through the East End, then the heartland of London’s Jewish community.

Incensed at the plans (and faced with government inaction despite calls for the march to be called off), anti-fascist protestors – which included large numbers of Jewish and Irish people as well as trade unionists, communists, socialists, anarchists and local residents – gathered initially at Gardiner’s Corner (named for a department store which once on the site at the junction of Whitechapel High Street and Commercial Road) to prevent the march.

The protestors were chanting and carrying banners which read “No Parasan” (“They shall not pass”, a slogan taken from anti-fascist forces who used it during the Spanish Civil War).

Estimates as to how many people turned out in protest vary widely – from 100,000 people up to as many as 250,000 or even 500,000 – but it’s clear that whatever the actual number, the crowd was huge and vastly outnumbered the up to 3,000 fascists – known as Blackshirts – who turned up to march and the 10,000 Metropolitan Police officers, some of whom were on horseback, sent to prevent the march from being disrupted.

With the path blocked despite police charges into the crowd, Mosley and his Blackshirts were advised by authorities to head south to Cable Street but there they encountered road-blocks made from furniture, paving stones and even apparently overturned lorries which appeared at the street’s west end, around the junction with Christian Street.

Police again attempted to clear the road but were blocked by the makeshift barricades and a wall of protestors while residents in houses lining the streets threw rubbish and even the contents of chamber pots at them. Police responded by sending in squads of men to snatch the ringleaders of the protests; protestors responded by ‘kidnapping’ some police officers.

Faced with continuing violence, Mosley was forced to abandon the march and the BUF were dispersed back through the City of London. The protestors meanwhile were said to have turned the event into a giant street party in celebration of their victory.

More than 100 people were said to have been injured in the violence and some 150 of the demonstrators were arrested. Most of the charges were of a minor nature but some of the ringleaders were given up to three year terms of imprisonment.

A large mural depicting the battle was painted on the side of St George’s Town Hall in Cable Street in the 1980s and there’s also a red plaque in nearby Dock Street (pictured) commemorating the incident.

Aside from a victory in itself, the battle was the catalyst for the passing of the Public Order Act of 1936 which meant the organisers of marches would henceforth have to seek permission of the police before holding them. It also banned demonstrators from marching in uniform.

PICTURED: A plaque commemorating the ‘battle’ in Dock Street which runs off the west end of Cable Street. Via Richard Allen/Wikipedia

Top posts of 2015 – The site of Queen Boudicca’s defeat?; and, just what was The Great Conduit?…

2016 is fast approaching and to celebrate, we’re looking back at the 10 most popular posts we published in 2015. Today, we look at numbers four and three…

boudicca
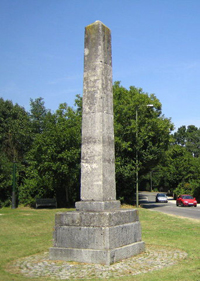
4. Number four is another in our current series on London battlefields – this time looking at the site where Queen Boudicca is believed to have been defeated by the Romans – 10 London ‘battlefields’ – 1. Queen Boudicca takes on the Romans

3. Our second top 10 entrant from the Lost London series, this post, published back in September, looked at the history of the Great Conduit – Lost London – The Great Conduit

The countdown finishes tomorrow with a look at the most and second most popular articles were posted in 2015…

Top posts of 2015 – A lost ‘castle’; Jack Cade and London; and, a garden in Seething Lane…

2016 is fast approaching and to celebrate, we’re looking back at the 10 most popular posts we published in 2015. Today, we look at numbers seven, six and five…

Baynard's-Castle
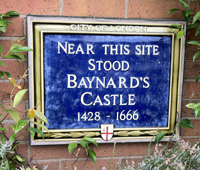
7. At number seven is a post we published in February as part of our ongoing Lost London series. In it we looked at the later history of the fortification known as Baynard’s Castle – Lost London – Baynard’s Castle (part 2)

6. Another in our series on London’s ‘battlefields’ – this one, published in November looks at the role the city played in Jack Cade’s rebellion during King Henry VI’s reign – 10 London ‘battlefields’ – 4. Jack Cade’s rebellion

5. Our fifth most popular post of 2015 was another in our series on gardens – 10 small, ‘secret’ and historic gardens in central London…5. Seething Lane Garden

We’ll look at numbers four and three tomorrow…

Top posts of 2015 – A garden gem; London and the Peasant’s Revolt; and, the Duke of Wellington’s cloak…

Goldsmiths12016 is fast approaching and to celebrate, we’re looking back at the 10 most popular posts we published in 2015. 

10. Our 10th most popular post was published in July came from our special series on “10 small, ‘secret’ and historic gardens in central London” and looks at the origins of The Goldsmith’s Garden – 10 small, ‘secret’ and historic gardens in central London…1. Goldsmiths’ Garden…

9. Published in November, our ninth most popular post was from our current special series on London ‘battlefields’ and looks at the role the city played in the 14th century Peasant’s Revolt – 10 London ‘battlefields’ – 3. London sacked in the Peasant’s Revolt…

8. At number eight is a post from our long-running Treasures of London series, which, in the year of the 200th anniversary of the Battle of Waterloo, looks at a recent acquisition by the National Army Museum – Wellington’s cloak – Treasures of London – Duke of Wellington’s cloak…

We’ll look at numbers seven through five tomorrow…


10 London ‘battlefields’ – 7. Battle of Brentford…

Syon-Park

Yes, we’re a bit out of order here given we looked at the subsequent Battle of Turnham Green last week, but today we’re taking a look at the Civil War fight known as the Battle of Brentford.

As recounted last week, having taken Banbury and Oxford in the aftermath of the Battle of Edgehill, the Royalist army marched along the Thames Valley toward London where a Parliamentarian army under the Earl of Essex waited.

Battle-of-BrentfordHaving arrived at Reading to the west of London, King Charles I, apparently unconvinced peace talks were heading in the right direction, ordered Prince Rupert to take Brentford in order to put pressure on the Parliamentarians in London.

On 12th November, 1642, up to 4,600 Royalists under the command of the prince engaged with two Parliamentarian infantry regiments at Brentford, one of the key approaches the City of London. The Parliamentarians were under the command of Denzil Hollis (who wasn’t present) and Lord Brooke – various estimates put their number at between 1,300 and 2,000 men.

Prince Rupert’s men – consisting of cavalry and dragoons – attacked at dawn under the cover of a mist. An initial venture to take a Parliamentarian outpost at the house of Royalist Sir Richard Wynne was repulsed by cannon fire but Sir Rupert ordered a Welsh foot regiment to join the fight and the outpost was quickly taken.

The Cavaliers then pushed forward across the bridge over the River Brent (which divided the town) and eventually drove the Parliamentarians from the town and into the surrounding fields (part of the battle was apparently fought on the grounds of Syon House – pictured at top).

Fighting continued into the late afternoon before the arrival of a Parliamentarian infantry brigade under the command of John Hampden allowed the Roundheads to withdraw.

About 170 are believed to have died in the battle (including a number who drowned fleeing the fighting). Followed by the sack of the town, the battle was a success for the Royalists who apparently captured some 15 guns and about 400 prisoners. The captured apparently included Leveller John Lilburne, a captain in Brooke’s regiment.

The Royalists and Parliamentarians met again only a few days later – this time at Turnham Green (for more on that, see last week’s post).

Incidentally, this wasn’t the first battle to be fought at Brentford. Some time over the summer of 1016, English led by Edmund Ironside clashed with the Danes under the soon-to-be-English king Canute. Edmund was victorious on the day, one of a series of battles he fought with Canute.

Meanwhile, more than 1000 years earlier, it was apparently at Brentford that the British under the King Cassivellaunus fought with Julius Caesar’s men in 54 BC on their approach to St Albans (Verulamium).

A pillar stands High Street in Brentford commemorating all three battles while there is an explanatory plaque about the battle in the grounds of Syon Park.

For more the Battles of Brentford and Turnham Green, see www.battlefieldstrust.com/brentfordandturnhamgreen.

10 London ‘battlefields’ – 6. Battle of Turnham Green…

Battle-of-Turnham-Green

Part of the English Civil War, this battle – really no more than a skirmish – between the Royalists and the Parliamentarians which prevented the Royalists from attacking London which ultimately forced the Royalists to spend winter in Oxford.

Having taken Banbury and Oxford in the aftermath of the inconclusive Battle of Edgehill, a Royalist army had marched along the Thames Valley toward London.

On the 12th November, 1642, the Royalists had defeated two Parliamentarian regiments at Brentford to the west of the City of London. Under the command of Patrick Ruthven, Earl of Forth, but with King Charles I among them, the Royalists, who numbered some 12,000 men, then camped overnight at a site believed to be at or near the village of Turnham Green, now in west London.

Meanwhile, a Parliamentarian army under command of Robert Devereux, Earl of Essexjoined up with London militia under the command of Major General Philip Skippon at Chelsea Field. Numbering some 24,000, they advanced upon Turnham Green where the Royalists awaited them.

By 8am on the 13th, the two armies had formed lines running roughly north to south across Turnham Green, Chiswick Common Field and Acton Green with the Parliamentarian line stretching from the site of what is now Turnham Green Tube station to the grounds of Chiswick House and the Royalist lines stretching from south of Chiswick Park Tube station to the Great West Road.

Both lines apparently had infantry at the centre with cavalry on the flanks. Essex, attempting to outflank the Royalists, sent troops to high ground at Action but, concerned about splitting his army, soon withdrew them.

The battle them became something of a stalemate – Essex, not seeking to do any more than block the Royalist advance, was happy to wait while the Royalists, outnumbered, short of ammunition and said to have been unwilling to put the Londoners offside, did likewise.

Eventually, late in the afternoon, the Royalists withdrew westward and Essex, who was much criticised for it afterward, gave a half-hearted pursuit. King Charles I then ordered his army back up the Thames Valley to Oxford where they ended up passing the winter.

Less than 50 men in total are said to have died in the indecisive clash which, it can be argued, helped to ensure that the Civil War would go on for another four long years.

While much of the site of the skirmish has been built upon, glimpses of the open ground which once stood here can still be seen. There is an information panel about the battle opposite Turnham Green Tube station.

For more on the English Civil War, see Blair Worden’s The English Civil Wars: 1640-1660.

10 London ‘battlefields’ – 5. Battle of Barnet…

Hadley-HighstoneAn important battle during the late medieval Wars of the Roses, the Battle of Barnet was fought on 14th April, 1471, between the Yorkists, led by the deposed King Edward IV and Lancastrian forces loyal to the King Henry VI.

While we have looked briefly at the battle before as part of our A Moment in London’s History series (see here), we thought we’d take a more in-depth look.

Edward had been driven from the throne in October, 1470, after his alliance with the powerful Richard Neville, Earl of Warwick, the “Kingmaker”, fell apart. With King Henry VI restored to the throne, Edward was exiled over the Channel.

By early 1471, Edward was ready to make his push for the throne again and in March he landed in Yorkshire in England’s north along with his brother-in-law, the Duke of Burgundy.

Heading south, Edward gathered more troops as he went, briefly pausing at Coventry where the Earl of Warwick refused to offer battle before pressing on to London, arriving unopposed on 12th April. There he was reunited with his wife Elizabeth Woodville and young son Edward (later Edward V) and the hapless King Henry VI was once again  taken into Yorkist custody.

The Earl of Warwick, who had been raising troops in the Midlands, moved with a 15,000-strong force to confront him and took up a position about a mile north of the village of Barnet, just north of the City, on 13th April.

Edward – who brought 10,000 to 12,000 troops to the fight and had his brothers, the erstwhile traitor George, Duke of Clarence, and the young Richard, Duke of Gloucester, by his side – arrived that same evening and took up a position just to the south of the Lancastrians. Unaware of the close proximity of the Yorkists (it’s not known whether this was by accident of design but Edward had instructed his men not to light fires and to keep silent), the Lancastrian artillery flew over their heads.

The battle was joined in earnest the following day – Easter Sunday – at around dawn. The Lancastrians were initially successful in driving back Edward’s forces on the right flank under the command of John de Vere, the Earl of Oxford, but thick fog is said to have been responsible for sowing confusion in the Lancastrian ranks, leading to allies attacking each other and the Lancastrian army eventually fell apart amid cries of treachery.

Warwick was killed in the battle as he attempted to reach his horse. His body was allowed to be displayed at St Paul’s before being buried in the family vault.

The exact site of the battle remains something of an unknown although it is thought to be located in Monken Hadley just to the north of Barnet itself (that is the area marked on the official English Heritage Register of Historic Battlefields).

A stone monument to the battle, the Hadley Highstone, was erected in the 18th century and in the 1800s was moved to its current location at the junction of Kitts End Road with the Great North Road in Monken Hadley and was originally thought to have marked the spot on which Warwick died. The Battlefields Trust is currently developing a project to pin down the location further.

The battle was a resounding victory of King Edward IV for while some suggest the numbers killed were said to be about the same on both sides – somewhere between 1,000 and 4,000, Warwick was removed, depriving the Lancastrians of a key ally and giving the Yorkists a significant edge in the ongoing conflict which saw Edward IV back on the throne for the next 14 years.

PICTURE: Nigel Cox/Wikipedia

For more on the Wars of the Roses, see Alison’s Weir’s book Lancaster And York: The Wars of the Roses.

10 London ‘battlefields’ – 4. Jack Cade’s rebellion…

London-StoneLittle is known of Jack Cade until the former soldier from Kent led an uprising against the rule of King Henry VI during the Hundred Years War with France. And London was a key site of fighting during the uprising.

Cade, who adopted the name John Mortimer and who some claimed to have been a relative of Richard, Duke of York, was said to have been a veteran of the war who led rebels protesting against the king’s rule amid the general state of disorder affecting England at the time which saw such abuses as lands being illegally seized and a lack of confidence in courts to rule fairly. There was also some discontent over the loss of lands of Normandy.

While many of the rebels were peasants, the rebellion – which rose in late May or early June, 1450 – was also supported by nobles and churchmen who were protesting what they saw as poor governance.

Led by Cade, who also attracted the title ‘Captain of Kent’, were camped on Blackheath in what is now the city’s south-east by mid-June and there apparently presented an embassy from the king with a list of grievances.

Thomas, Lord Scales – authorised by the king to raise troops, subsequently marched out to Blackheath but Cade and his rebels retreated into the forests of Kent and managed to lure the royal troops into an ambush.

Cade and the rebels returned to Blackheath while back in London the Royal soldiers turned mutinous, angered over the defeat. They were disbanded to protect the City and the king retired to Kenilworth Castle, effectively abandoning London to the rebels (despite the offer of the Lord Mayor and aldermen to resist the rebels).

Cade then marched on London itself, reaching Southwark on 2nd July (apparently using the now vanished White Hart Inn as his HQ). He forced his way over London Bridge the next day, cutting the drawbridge ropes personally with his sword to ensure it couldn’t be raised again

Such was the support the rebels had in London, that resistance was initially minimal. Following his entry to London, Cade struck the famous London Stone (pictured above – for more on it, see our earlier post here) with his sword, declaring “Mortimer” was now lord of the city.

While initially under tight control, Cade gradually lost control of many of his followers who turned to looting. Meanwhile, to head off an attack on the Tower of London – where Lord Scales had retreated – he handed over the hated Lord Treasurer, James Fiennes, Lord Saye, and his son-in-law William Crowmer, Under Sheriff of Kent (they had apparently been imprisoned in the Tower by the King for their own protection such as their unpopularity). Both were beheaded – Fiennes at Cheapside, Crowmer at Mile End – and their heads placed on poles on London Bridge.

The king’s supporters in the Tower had regrouped by early July and, with the rebels, while initially welcomed by many, now clearly having outstayed their welcome, they and city militias drove the rebels from the streets and had taken back the northern half of London Bridge (another bloody battle over the bridge) when William of Waynflete, Bishop of Winchester, arrived with promises of pardon for the rebels on behalf of the Lord Chancellor and Archbishop of Canterbury, John Kemp.

His forced much reduced, Cade – a pardon in his pocket under Mortimer’s name only – moved back into Kent and continued to cause trouble. He was, however, captured by the new Sheriff of Kent, Alexander Iden, on 12th July, – one version says this took place near Heathfield in Sussex at a hamlet now known as Cade Street. In any event, Cade was mortally wounded during the struggle and died en route to London.

His corpse, however, completed the journey and Cade was hanged, drawn and quartered and his head placed atop a pole on London Bridge.

While the rebel ringleaders were later captured and killed, in the most part King Henry VI honoured the pardons he had granted.

The story of Cade’s rebellion features in William Shakespeare’s play, King Henry the Sixth.

10 London ‘battlefields’ – 3. London sacked in the Peasant’s Revolt…

Tower-of-London1OK, so not really a battle although it must have felt something like that to those involved (and the ‘battlefield’ turned out to be much of the City itself), the uprising known as Peasant’s Revolt of 1381 saw two great armies march upon London – one from Kent led by Wat Tyler and another from Essex which is said to have been under the command of Jack Straw.

The armies had risen in response to a series of events which they saw as unjust and which trace their origins back to the Black Death. Killing about a third of the population when it struck some 30 years earlier, this had resulted in a growing demand for labourers to work the fields raising, as one might expect, hopes of increased wages and greater freedom of movement among the peasant class.

But to ensure the social order was maintained, authorities had not only put limits on how much farm workers could be paid but ensured long-standing but increasingly unpopular practices – such as serfs being forced to work some time for free for their landlords – were maintained. On top of this came the imposition and enforcement of a series of poll taxes to fund England’s wars with France.

The poll taxes – and the harsh way in which they were enforced – were a step too far and when a tax collector visited the village of Fobbing in Essex in May, 1381, he was shown short shrift and thrown out. The unrest soon spread and by June, the rebels, having rampaged through the countryside were marching on London.

By 12th June, the men from Essex were camped at Mile End while Tyler and his army from Kent were at Blackheath. The next day, after being denied a meeting with the king, the rebels headed into the City where sympathetic Londoners opened the gates. Once inside, they targeted the property of those they deemed responsible for their misfortune, opening prisons and destroying any legal records they could find.

Foremost among the sites attacked and looted was the Palace of Savoy (see our earlier post here), home of the King’s uncle John of Gaunt, Duke of Lancaster, and, as the power behind the throne, the man many deemed as the ultimate source of the ills besetting them (John himself had a lucky escape – he was away from the city when the palace was attacked.).

King Richard met with the leaders of the men from Essex on 14th June at their camp at Mile End and, after they pledged their allegiance, agreed to their petitions to abolish serfdom and allow them to sell their labour. But the attacks, meanwhile, were continuing in the City with a group of rebels led by Tyler storming the Tower of London (pictured above) the same day and seizing and beheading the Simon of Sudbury, the Archbishop of Canterbury and Chancellor, along with the Robert Hales, Lord High Treasurer and Prior of St John’s in Clerkenwell – both key figures in the government of the king (you can read more about Simon of Sudbury here).

The following day – 15th June – King Richard again met with the rebel leaders – this time with Wat Tyler, leader of the Kentish band, at Smithfield. It was then that things went awry for the rebels. Apparently enraged by Tyler’s insolence (already stories differ as to exactly why he did so), the Lord Mayor of London, Sir William Walworth (see our earlier post here), stabbed Tyler in the neck. King Richard managed to keep the situation under control until armed troops arrived and after the king declared a general pardon, the rebels dispersed.

Tyler, meanwhile, was taken to St Bartholomew’s Hospital but on the orders of the Lord Mayor was dragged from his bed and beheaded (his head was displayed atop a pole positioned in a field). He was among dozens of the rebels who were subsequently executed for their role in the uprising (leaders Jack Straw and another, John Ball, were among them).

10 London ‘battlefields’ – 1. Queen Boudicca takes on the Romans…

boudicca

This month marks the 600th anniversary of the Battle of Agincourt and to mark the occasion, we’re looking at 10 of London’s “battlefields” (well, maybe not officially recognised battlefield sites but 10 places where fighting took place – or, as in this instance, legend says took place – at various times throughout London’s history).

First up it’s to King’s Cross, once said to have been site of a village known as ‘Battle Bridge’, so named because, according to tradition, it here in about 60AD that the rebellious hoards of Queen Boudicca (also known as Boadicea or Boudica) ran into the well-disciplined army of the Roman Governor of Britain, Gaius Suetonius Paulinus.

Paulinus had been campaigning in northern Wales when the Iceni rebellion broke out in East Anglia, apparently sparked by the Romans’ refusal to honour the will of the deceased King Prasutagus. He had left his land to the Emperor Nero and his two daughters but instead, the story goes that the Romans seized the land, flogged his wife Boudicca and raped his two daughters.

Understandably incensed at this treatment, the Iceni and members of other tribes rose in rebellion under Boudicca and laid waste to the Roman city of Camulodunum (what is now Colchester in Essex).

Boudicca then turned toward Roman Londinium, the provincial capital, and while Paulinus beat her there with a small number of troops, he quickly concluded he couldn’t defend it and ordered it evacuated. Boudicca, who is claimed to have fought from a chariot, and her army of tribesman apparently spared no-one when they arrived and burnt it to the ground. They then moved on to attack another Roman city – Verulamium (St Albans).

Paulinus, meanwhile, marshalled his forces – still apparently vastly outnumbered – and chose his battleground carefully. One legend suggests King’s Cross – then site of an ancient bridge across the River Fleet – as the battle’s location (although we should mention there are also numerous other sites which have been suggested as the location for the battle including locations in the Midlands along the Roman road of Watling Street, now the A5).

Where-ever it was, Paulinus had apparently chosen his position so that Boudicca couldn’t bring her greater numbers to bear on his flanks. Her army collapsed and, according to the Roman historian Tacitus, there was a rumour that 80,000 Britons were killed and just 400 Romans in the ensuing battle (although fair to say such numbers may be a stretch!).

The outcome was obviously devastating for Boudicca – there’s various accounts of what happened to her next with one being that she fell during the battle and another that, having survived, she committed suicide by poisoning herself. There is a legend that Boudicca was subsequently buried at a site now covered by platform nine or 10 at King’s Cross railway station. It’s also been suggested she was buried at Parliament Hill.

There’s a statue commemorating Boudicca and her daughters (pictured above) at the western end of Westminster Bridge. Designed by Thomas Thornycroft, it was made in 1850 but not erected on the site until 1902.

A Moment in London’s History – The Battle of Barnet helps to secure the throne for King Edward IV (again)…

It was exactly 543 years ago today that the Battle of Barnet – one of the key battles of the Wars of the Roses – was fought near what was then the small town of Barnet but is now an area on Greater London’s outer northern fringe.

Hadley-HighstoneKing Edward IV, returning from exile in Burgundy after he was ousted by the Lancastrians, led an estimated 10,000 Yorkists in an engagement with some 15,000 Lancastrians (who backed King Henry VI) under the command of Richard Neville, 16th Earl of Warwick and known as the Kingmaker, who had previously supported the Yorkists (and before that the Lancastrians).

The forces met on 14th April, 1471, at around dawn but thick fog sewed confusion in the Lancastrian ranks with allies attacking each other and the army eventually fell apart amid cries of treachery. Warwick was killed in the battle as he attempted to flee.

The exact site of the battle remains something of an unknown although it is thought to span the community of Monken Hadley just to the north of Barnet itself (that is the area marked on the official English Heritage Register of Historic Battlefields).

A stone monument to the battle, the Hadley Highstone, was erected in the 18th century and in the 1800s was moved to its current location at the junction of Kitts End Road with the Great North Road in Monken Hadley and was originally thought to have marked the spot on which Warwick died. The Battlefields Trust is currently developing a project to pin down the location further.

The battle was important because, along with the following Battle of Tewkesbury during which the Lancastrian heir Edward was killed (and the murder of King Henry VI shortly after), it secured the throne for King Edward IV for the next 14 years.

PICTURE: Nigel Cox/Wikipedia